
Last night I had a break from all the Christmas baking I’ve been doing and made these: cupcakes for Karein’s last day in the office before she goes on maternity leave. I think they might be the cutest cupcakes I’ve ever made so last night I stayed up to write this blog post just so I could post it as soon as possible!
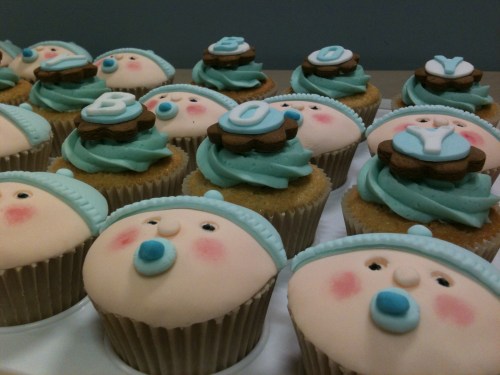
I did a google image search a few months ago when I was looking for ideas for cupcakes for Laura before she went on maternity leave and I came across these. I thought they were too cute not to make but I was too busy at work when it came to making Laura’s cupcakes. However, I knew that a couple of months later I would have the chance to make them for Karein (although a blue, boy version rather than pink, girl ones).

In order to make the same decorations as I did, you will need the following:
- 24 cupcakes – I made vanilla cupcakes (1 and a half times recipe which you can find here). However you could make any flavour.
- enough buttercream to ice 24 cupcakes – I used 1 and a half times recipe which you can find here
- piping bag and star nozzle
- 200g white fondant icing (and blue, ivory and pink food colouring)
- icing sugar and a rolling pin
- small B, O and Y cutters, a small circle cookie cutter and a large one (the size of the top of a cupcake)
- 12 small biscuits (I cut them out using a small flower cookie cutter) – I had gingerbread dough left in the fridge from making gingerbread men the other day so I just used that up
- a paintbrush and black gel food colouring
- a small straw – I actually used a candle holder which you use to put birthday candle into cakes but I think a straw would work better!
- Icing sugar and water mixed together to a paste for sticking things together or some white royal icing

You will then need to do the following:
- Firstly, colour about half the icing to make a flesh colour – I used ivory and a bit of pink food colouring. Colour most of the rest of it pale blue and leave a bit white.
- Dust the surface with icing sugar and roll out the white icing so it’s a 1-2 mm thick. Using a small round cutter, cut out 6 small circles and then using the letter cutters, cut out 2 B’s, 2 O’s and 2 Y’s. Cut out the same from the pale blue icing
- Assemble the 12 cookies by sticking (using the royal icing or icing sugar and water paste) a circle of blue or white icing to each one, followed by a letter of the opposite colour. You should then have four sets of “BOY” cookies – 2 white with blue letters and 2 blue with white letters.
- Next, using a palette knife spread a dome of buttercream on to the top of 12 of the cupcakes and then put them in the fridge for about 10 minutes so the buttercream hardens. Colour the remaining buttercream pale blue and place into the piping bag with a star nozzle attached. Pipe a rose of buttercream onto the remaining 12 cupcakes and then place one of the cookies on top of each one.
- Roll out the flesh coloured icing so it is about 1mm thick and using the large round cookie cutter cut out 12 circles. Remove the cupcakes from the fridge and place a circle on top of each one. Smooth it down to the edges of the cupcake cases.
- Roll out the rest of the pale blue icing to about 1mm thick and using the large cutter again cut out 6 circles. Cut each circle in half (to be the hats) and then cut a strip about 1-2mm off the bottom of each semi circle. Using a few drops of water stick a hat onto each cupcake. Then with a couple more drops of water stick a strip to the bottom of each hat. With the back (rather than the sharp side) of a small knife, make indents all the way along the rim of each hat.
- Using the off cuts of the blue icing, make 12 small balls and stick (with a drop of water) onto the top of each hat. Then using the off cuts of the flesh coloured icing make 12 smaller balls and stick to the middle of each face for a nose.
- Roll out 12 larger balls of the blue icing and squash to make them into discs. Stick one to each face, below the nose, as a dummy. There should still be some pale blue icing left – add a bit more blue food colouring to it to make it darker and shape 12 small “loops” out of it and stick one to each dummy.
- Using the small straw (or candle holder!), push gently into the icing to make 2 eyes on each cupcake. With the small paintrush, paint half the inside of these indents with black gel food colouring.
- Put a tiny bit of pink food colouring onto the end of one of your fingers and dab it on a spare bit of icing until it has nearly gone. While there is still a bit left gently rub rosy cheeks onto each face.
- The final touch is to add a dot of white royal icing onto the blacks of the eyes. Once you’ve done that, you’ll then have 12 extremely cute baby boy cupcakes!

I agree, you have made some amazing things but these are some of the best…sooo cute! How can you possibly eat them!
thanks! I don’t think I can – I’m going to be having a non-baby one!
[…] first stages are similar to the baby boy cupcakes I made (more detailed instructions here) but essesntially you take 12 cupcakes and ice with a small dome of buttercream on top and then […]
[…] The elves are probably my favourite – how cute are those little pointy ears? I think they might be too cute to eat. They were made in a very similar way to the baby boy cupcakes I made about a year ago. For details, click here. […]